Auto Body & Repair Blog
Expert tips, collision repair guides, custom paint advice, and industry news from Auto Parts Outlet.
Why Choose Automotive Masking Sheeting for Auto Painting?
Table of Contents
- What Automotive Masking Sheeting Is and How It Supports Auto Painting
- Key Properties That Make Masking Sheeting Suitable for Vehicle Refinishing
- How to Select the Right Masking Sheeting for Different Painting Tasks
- Step-by-Step Use of Automotive Masking Sheeting During Vehicle Painting
- Common Application Errors and Safe Removal Practices
- FAQS
- Conclusion
- Related Posts
In a professional auto body shop, clean paint lines begin with careful preparation. Automotive Masking Sheeting helps protect glass, tires, trim, interiors, and nearby panels from overspray. During refinishing, even a small gap can leave fine paint dust on a windshield. That dust creates extra cleaning work and may affect the final presentation. Experienced technicians use masking sheeting because it covers large areas quickly and supports consistent preparation. It can also reduce the chance of accidental paint contact during spraying.
The material is lightweight, flexible, and easy to position around vehicle contours. Many products include static-cling or pre-taped edges, which can improve handling around doors, hoods, and mirrors. A technician can cut openings for door handles, lamps, or repair zones without covering the entire vehicle unnecessarily. Good masking is not only about speed. It is about controlling where paint travels. That matters when using spray guns, primers, basecoats, or clearcoats in a busy workshop.
Small details matter.
However, no sheeting solves poor preparation. Surfaces must be clean, dry, and free from loose dust before masking begins. The edges should be sealed carefully, especially near panel gaps and wheel arches. Some films can tear, shift, or attract static dust when handled roughly. That deserves honest consideration. Professional results depend on the product, application method, and technician’s judgment. When selected for the repair and used correctly, Automotive Masking Sheeting provides a practical layer of protection, supports efficient workflow, and helps deliver sharper paintwork with fewer avoidable corrections.
What Automotive Masking Sheeting Is and How It Supports Auto Painting
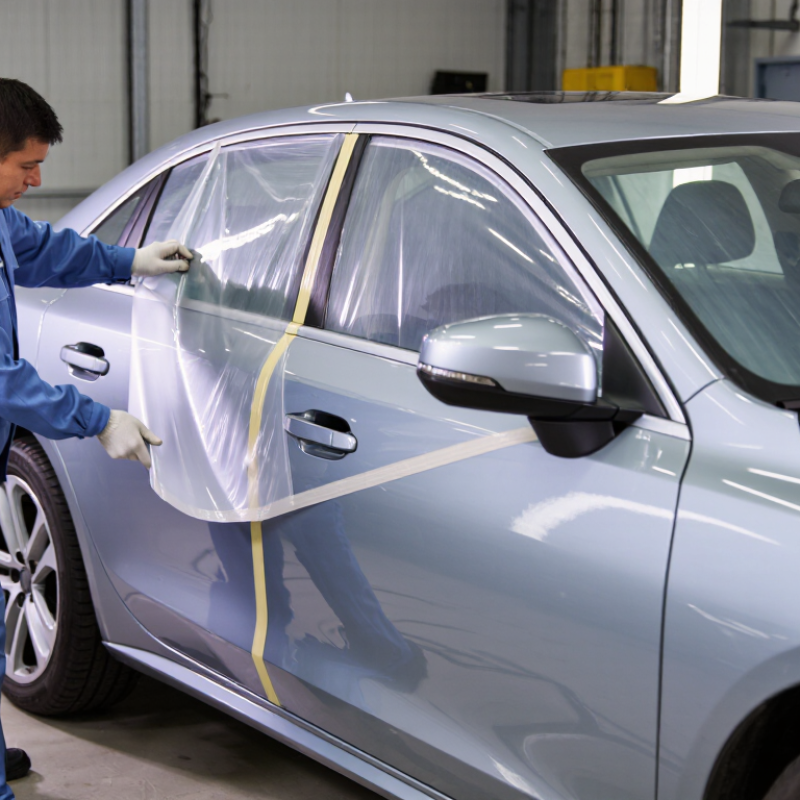
Automotive masking sheeting is a lightweight plastic film used to cover areas that should not receive paint. It protects glass, tires, trim, door handles, and nearby panels during spraying. Unlike loose paper, the film can wrap large surfaces quickly and stay in place with suitable masking tape. In a repair bay, this reduces overspray cleanup and helps technicians maintain a sharper paint boundary. The material is not simply a disposable cover. Its thickness, static behavior, and resistance to paint solvents affect daily performance.
A trained painter selects sheeting according to the repair area and coating process. Thin film may suit short jobs, while heavier film offers better control around edges and busy work zones. Clean, dry surfaces matter. Dust trapped under the film can leave marks, and poorly sealed edges may allow fine paint mist to travel. I have found that careful folding around mirrors and wheel arches saves more time than rushing the first minute. That lesson is easy to overlook.
Good masking sheeting supports consistent preparation, but it cannot correct weak technique. The painter still needs even tape pressure, clean overlaps, and enough clearance from the spray path. Some films attract static and hold dust, especially in dry conditions. That behavior deserves attention. Removing the film too early can smear wet coating, while removing it too late may tear a crisp edge. Testing a small section first is a practical safeguard when the surface, temperature, or paint system changes.
Key Properties That Make Masking Sheeting Suitable for Vehicle Refinishing
Automotive masking sheeting protects vehicle surfaces during sanding, priming, and spray painting. In practical refinishing work, clean masking often separates a sharp repair from hours of correction. The sheeting should cover panels completely without dragging across wet coatings. Small details matter.
Tear resistance helps prevent accidental openings around doors, mirrors, and wheel arches. Good flexibility allows the material to follow curved panels and uneven body lines. Adequate opacity blocks overspray from reaching glass, tires, and interior trim.
A controlled static level can reduce dust attraction, although workshop conditions still influence results. Moisture resistance also matters when technicians use water-based preparation methods. Reliable sheeting should cut smoothly and stay fixed with compatible masking tape.
It must remove cleanly after curing, without leaving fibers or adhesive traces.
Material performance is not always perfect. A thin sheet may be easy to handle but vulnerable near sharp edges. A heavier sheet can provide stronger protection, yet it may be harder to position alone. Technicians should check surface temperature, coating instructions, and removal timing before each job.
Poorly sealed seams remain a common weakness. Careful overlap and firm edge pressing help control paint mist. The best choice depends on panel shape, spray method, drying conditions, and the repair area. Experience helps, but it should not replace a small test on an inconspicuous surface.
How to Select the Right Masking Sheeting for Different Painting Tasks
Why Choose Automotive Masking Sheeting for Auto Painting?
Selecting masking sheeting starts with the painting task, not the lowest price. For full-side repainting, use wide, low-lint polyethylene sheeting with consistent thickness. It should cover panels without dragging across wet primer. A slightly static-resistant surface helps reduce dust attraction. Still, no sheeting can correct poor booth cleaning.
For wheel arches, door jambs, and narrow trim, choose lighter sheeting that folds neatly around edges. Pre-cut pieces can save time, but they may leave gaps on unusual body shapes. Check the seam twice. Overspray can travel through a small opening and settle on a clean fender. For wet sanding or repeated masking, select material with stronger tear resistance and reliable tape adhesion.
The U.S. Environmental Protection Agency’s 6H refinishing rule requires spray methods achieving at least 65% transfer efficiency. This makes overspray control important, even though masking sheeting does not replace proper spray equipment. The EPA’s 2023 National Emissions Inventory continues to track solvent use from surface-coating activities as a VOC source. Choose sheeting that stays stable near airflow and does not shed fibers. A practical test is simple: tape a small section, spray nearby, and inspect the protected surface under bright light. I would not skip this test. A material that feels strong may still attract dust or split at a folded corner.
Why Choose Automotive Masking Sheeting for Auto Painting? - How to Select the Right Masking Sheeting for Different Painting Tasks
| Painting Task | Recommended Sheeting Type | Typical Thickness | Key Performance Requirements | Why It Fits the Task | Important Precautions |
|---|---|---|---|---|---|
| Spot repair and small panels | Pre-folded or standard polyethylene masking sheeting | Approximately 8–15 μm | Easy cutting, clean edges, low lint, adequate paint resistance | Lightweight film can be positioned quickly and reduces masking time on limited areas. | Secure all edges to prevent overspray from reaching adjacent trim or glass. |
| Complete vehicle exterior painting | High-coverage automotive masking film with electrostatic or cling properties | Approximately 10–20 μm | Large-sheet coverage, tear resistance, controlled static, compatibility with automotive coatings | Large rolls cover body panels efficiently and help reduce seams where overspray could pass through. | Use clean, dry surfaces and avoid stretching the film excessively around sharp corners. |
| Primer and surfacer application | General-purpose polyethylene film with moderate solvent resistance | Approximately 8–20 μm | Reliable barrier protection, low cost, smooth drape, minimal static attraction | Primer overspray is contained without requiring a heavy or highly specialized film. | Check that the film does not soften or become brittle when exposed to the selected coating system. |
| Basecoat application | Low-lint, paint-compatible masking film | Approximately 10–20 μm | Clean surface, low particle shedding, good edge stability, resistance to waterborne or solventborne overspray | Helps protect unpainted areas while reducing the risk of dust or fibers affecting the finish. | Do not reuse contaminated film; particles trapped on the film may transfer to wet paint. |
| Clearcoat application | High-clarity, low-shed masking film with strong paint adhesion characteristics | Approximately 12–25 μm | Low lint, stable edges, controlled static, resistance to clearcoat solvents | A clean, stable barrier helps protect adjacent surfaces during the final high-gloss coating stage. | Test compatibility first because some clearcoat solvents can affect unsuitable plastics. |
| High-temperature bake cycle | Heat-resistant masking film rated for the booth or oven temperature | Approximately 20–50 μm | Temperature stability, low shrinkage, clean removal, resistance to softening | A thicker, heat-rated film is less likely to shrink, melt, or leave residue during curing. | Confirm the actual temperature rating and dwell time; do not rely only on general-purpose film. |
| Window and glass protection | Transparent or translucent film designed for glass masking | Approximately 8–20 μm | Smooth coverage, clean removal, sufficient cling, compatibility with glass and masking tape | The film covers broad glass areas quickly and limits paint cleanup after spraying. | Avoid trapping moisture, dust, or solvent beneath the film before painting. |
| Wheel, tire, and underbody protection | Tough, tear-resistant polyethylene sheeting | Approximately 20–50 μm | Puncture resistance, flexible drape, overspray resistance, secure fastening | The heavier film withstands movement and contact with irregular or abrasive surfaces. | Keep the film away from moving parts, hot components, and areas that require ventilation. |
| Wet sanding and waterborne preparation | Moisture-resistant polyethylene film | Approximately 15–30 μm | Water resistance, dimensional stability, low absorption, easy wiping | The non-absorbent surface helps keep water and slurry away from protected areas. | Remove standing water before applying paint and replace film that has become contaminated. |
| Long-duration workshop protection | Heavy-duty film with UV and aging resistance where required | Approximately 30–80 μm | Extended durability, tear resistance, stable adhesion, resistance to dust and handling | A stronger film is better suited to vehicles that remain masked during multiple preparation stages. | Avoid leaving adhesive-backed materials in direct sunlight longer than the stated service period. |
Verify resistance to the solvents, water, additives, and curing conditions used in the primer, basecoat, and clearcoat.
For bake cycles, select film with a published temperature rating that covers both the peak temperature and exposure time.
Wider rolls and pre-cut formats can reduce seams, labor, and the risk of overspray on large vehicle surfaces.
Apply a small sample to a clean area and check cling, static, paint compatibility, shrinkage, and residue before production work.
Step-by-Step Use of Automotive Masking Sheeting During Vehicle Painting
Automotive masking sheeting protects glass, tires, trim, and unpainted panels from overspray. Its value depends on correct preparation, not simply covering the vehicle. Before painting, wash the body and remove wax, dust, and loose debris. Dry every edge carefully. Clean surfaces matter. Wear clean gloves to prevent fingerprints.
Measure the vehicle and cut enough sheeting for full coverage. Drape it from the roof, then smooth it across the sides without stretching the material. Cover wheels, windows, door gaps, and exposed handles. Cut openings with a sharp blade, keeping the blade away from painted surfaces. Overlap seams by 10 to 15 centimeters. Secure the edges with automotive-grade masking tape, pressing the tape firmly along curves and panel lines. Small gaps cause trouble.
During spraying, inspect the masking before each coat. Air movement can lift a loose corner and expose a mirror or windshield. Keep the sheet away from wet paint whenever possible. If the material touches a fresh surface, stop and reposition it instead of dragging it. After the final coat reaches the proper flash stage, remove the tape by pulling it back slowly at a low angle. Then fold the sheeting inward to contain residue. I once rushed this step and lifted a thin paint edge near a door seam. The mistake was preventable. A final inspection under bright light can reveal overlooked dust, loose tape, or tiny unprotected areas before they become expensive rework.
Common Application Errors and Safe Removal Practices
Why Choose Automotive Masking Sheeting for Auto Painting?
Common Application Errors and Safe Removal Practices
Automotive masking sheeting protects glass, trim, and interiors from overspray. Its value depends on correct application, not appearance alone. I have seen technicians cover a vehicle quickly, then discover paint dust beneath a loose wheel arch. The problem was not the sheeting. It was poor surface preparation and rushed sealing.
Clean, dry surfaces matter. Press the edge firmly around mirrors, door gaps, and wheel openings. Leave enough overlap between sheets, but avoid bulky folds that trap paint. Static can attract dust, especially in dry workshops. OSHA identifies chemical exposure and respiratory hazards as major autobody repair concerns. The U.S. Bureau of Labor Statistics reported 2.6 million nonfatal workplace injuries and illnesses in private industry during 2023. A tidy masking process supports safer work, although it cannot replace ventilation or suitable protective equipment.
Removal needs patience. Wait for the coating to reach the product maker’s stated stage, then test a small hidden edge. Cut tape joints carefully, never against fresh paint. Pull the sheeting slowly, keeping it low and folded back over itself. This reduces sudden lifting and limits loose overspray. Wear gloves and eye protection, even during cleanup. Do not shake dusty plastic inside the booth. Roll it inward and place it in the designated waste container. I sometimes remove masking too early. That saves minutes, but it can leave fingerprints, chips, or a ragged paint edge.
FAQS
It covers glass, tires, trim, handles, and unpainted panels during vehicle painting. It limits overspray and reduces cleanup.
Plastic film covers large areas quickly and stays in place with suitable masking tape. It also wraps around mirrors and wheel arches more easily.
Wash away wax, dust, and loose debris. Dry every edge carefully. Clean surfaces matter.
Drape it from the roof and smooth it across the sides without stretching. Cover windows, wheels, door gaps, and exposed handles.
Overlap sheet seams by 10 to 15 centimeters. Press tape firmly along curves, panel lines, mirrors, and wheel openings.
Some films attract dust, especially in dry workshops. Dust beneath the film may leave visible marks after painting.
Check it before every coat. Air movement can lift a corner and expose a mirror or windshield.
Remove it after the coating reaches the proper drying stage. Test a hidden edge first, because timing can vary.
Pull the tape slowly at a low angle. Fold the plastic inward to contain residue and loose overspray.
Rushing the first minute can leave loose edges, bulky folds, or exposed areas. I once removed masking too early and lifted a thin paint edge. The mistake was preventable.
Conclusion
Automotive Masking Sheeting is a practical protective material used during vehicle painting to cover windows, tires, trim, interiors, and other areas that should remain free from paint, dust, and overspray. Its lightweight structure, flexibility, tear resistance, and ability to conform to vehicle contours help improve painting efficiency while reducing cleanup work. Different sheeting types and sizes can be selected according to the vehicle area, paint process, and required level of protection.
Effective use begins with cleaning and drying the vehicle surface, choosing suitable sheeting, and securing it firmly with compatible masking tape. Edges should be sealed carefully to prevent paint from reaching protected areas, while loose sections should be removed before spraying. Common mistakes include leaving gaps, applying tape to dirty surfaces, and using damaged or unsuitable material. After painting, the sheeting should be removed slowly and safely once the coating has set enough to avoid lifting paint or leaving residue.

Blog Tags: